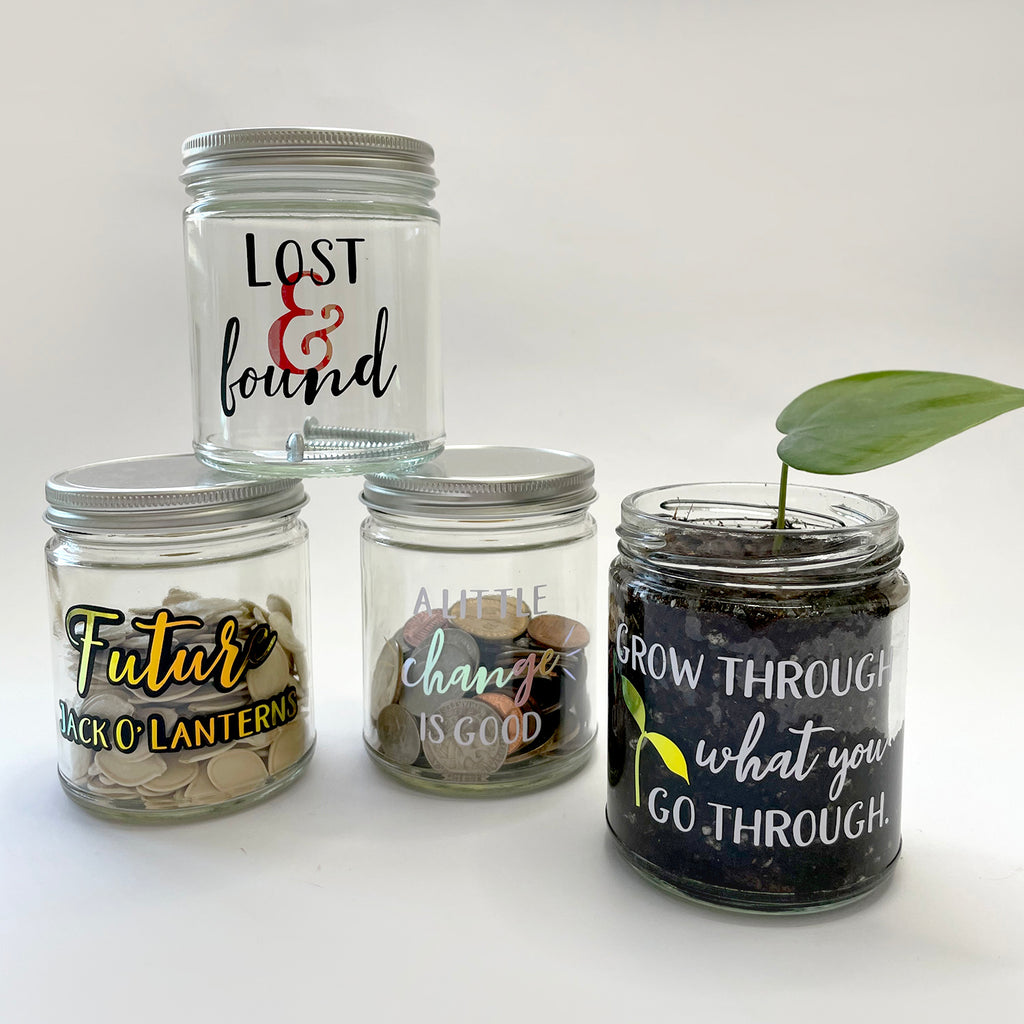
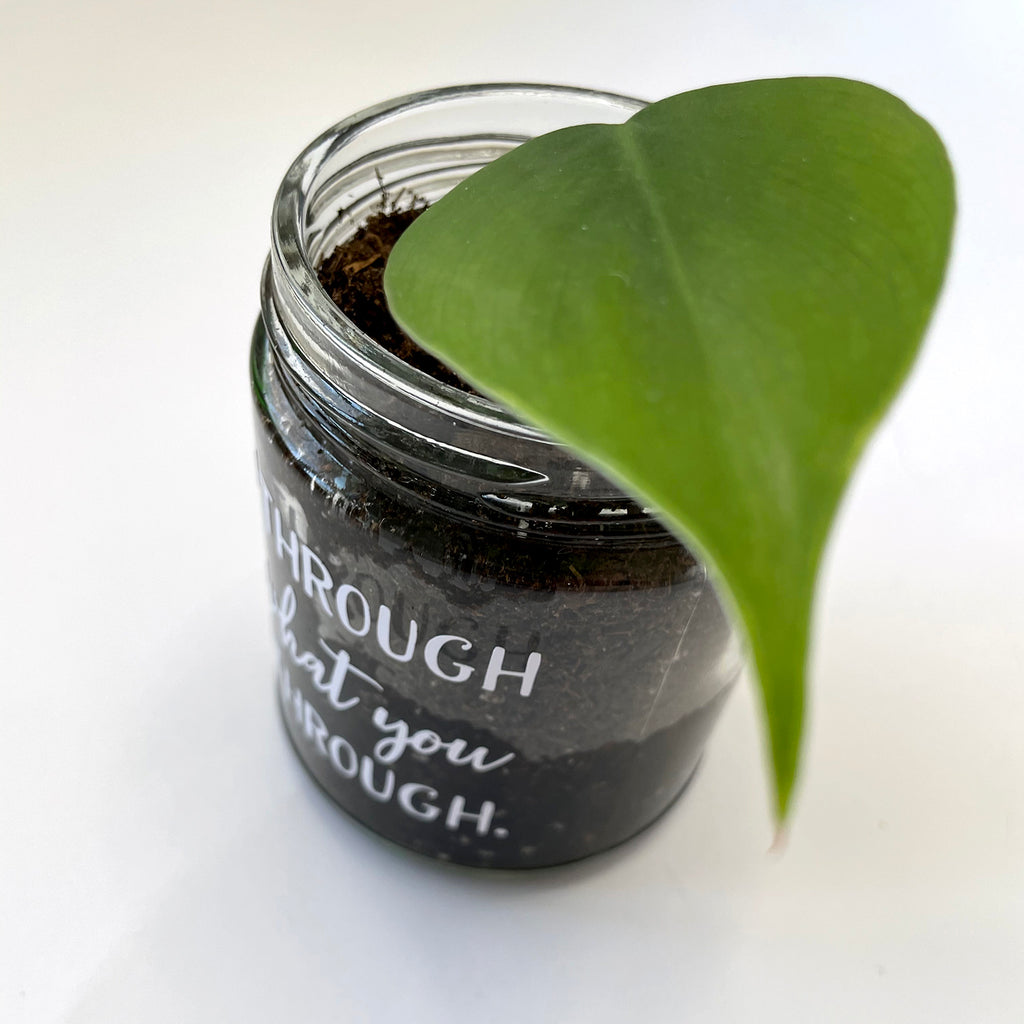
Succulents, seedlings or small plants can all take root in a glass jar. Whether you’re propagating some clippings (like me!), starting seedlings, or want to keep a small plant in your office, this is a great way to recycle jars with a wide mouth. I knew this project would have a dark background from the soil I used to plant my clipping, so a combination of Kassa white and holographic vinyl was a perfect choice.
Throw your pennies in the jar at the end of the day, or reward you little ones for doing the dishes. However you want to put a few cents away, a spare change jar is a fun way to create a little rainy day fund. I used a jar with it’s top to make a new home for loose change. You could also cut a slit in the top to make adding coins even easier.
In my house, each year we save pumpkin seeds to plant the next season, and the old envelope just wasn’t working anymore. Once the seeds are nice and dried out, they can happily live in a glass container until it’s time to plant them!
Create a space for buttons, screws, and other odds and ends. It’s like a junk drawer in a jar! We’ve all got extra bits and pieces hanging around that could use a new home.
Clearly, there are many more ways to re-purpose a glass jar, and for anything you can come up with, they take permanent vinyl really well for labeling. Let’s walk through the step-by-step on how to design and place label designs from Kassa permanent vinyl.
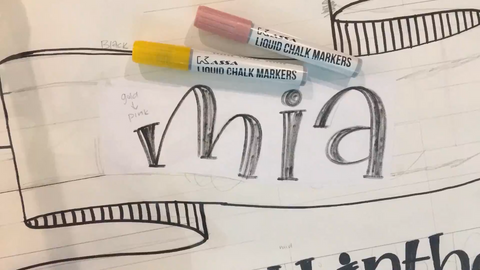
After deciding the purpose of your jar, we’re going to want to find the perfect font for your label. Sites like fontsquirrel.com, dafont.com or creativemarket.com are all great sources for font files both free and paid. For these designs I used the font duo Blishfully. It’s one of my favorite script and sans combinations. I drew my extra shapes in Adobe Illustrator, but you can use any combination of text/images that you’d like.
If you’re re-using a candle jar like I did, you can remove the wax from the bottom by filling the jar with boiling water. After it cools, the wax will sit on the surface of the water and be easily removable. From there, I used some Goo Gone to take the labels off for perfect blank glass jars. Whatever you’re using, you’ll want to make sure the glass surface of the jar is nice and clean. A quick wipe with rubbing alcohol can be helpful to make sure you’re ready to add vinyl.
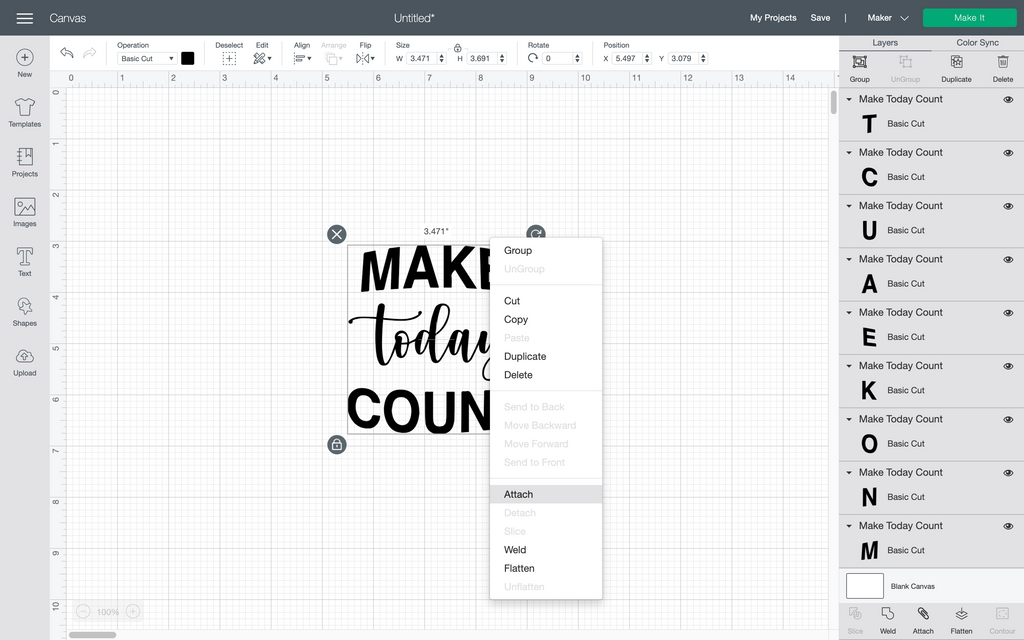
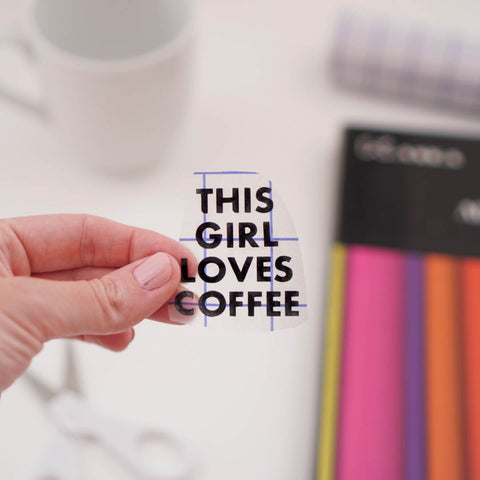
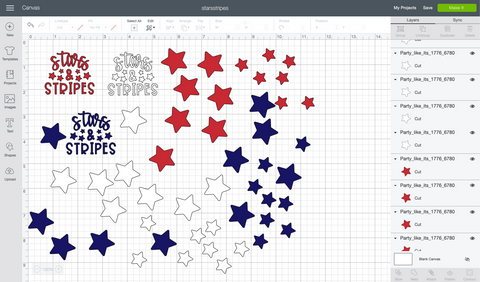
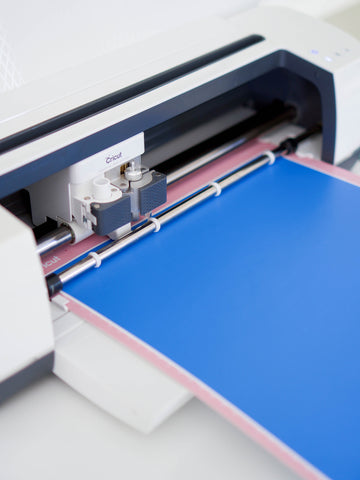
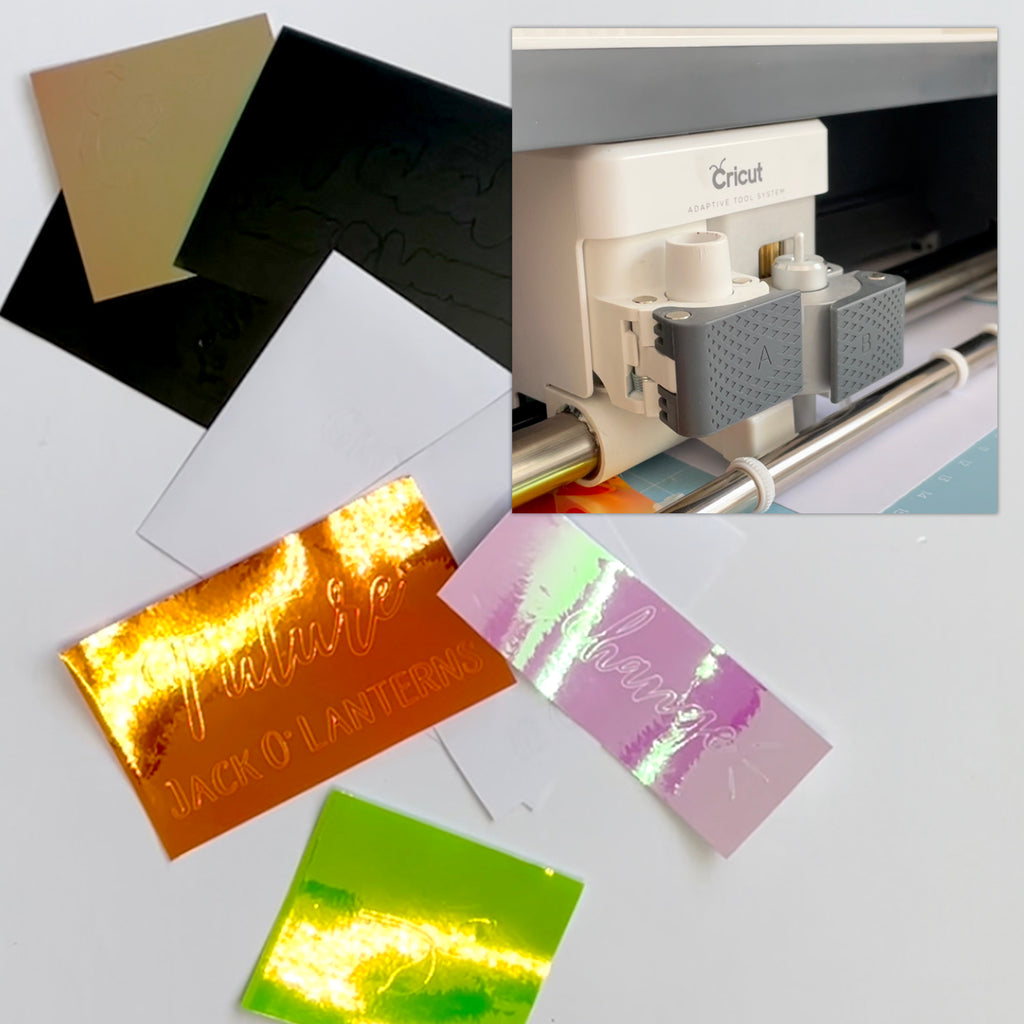
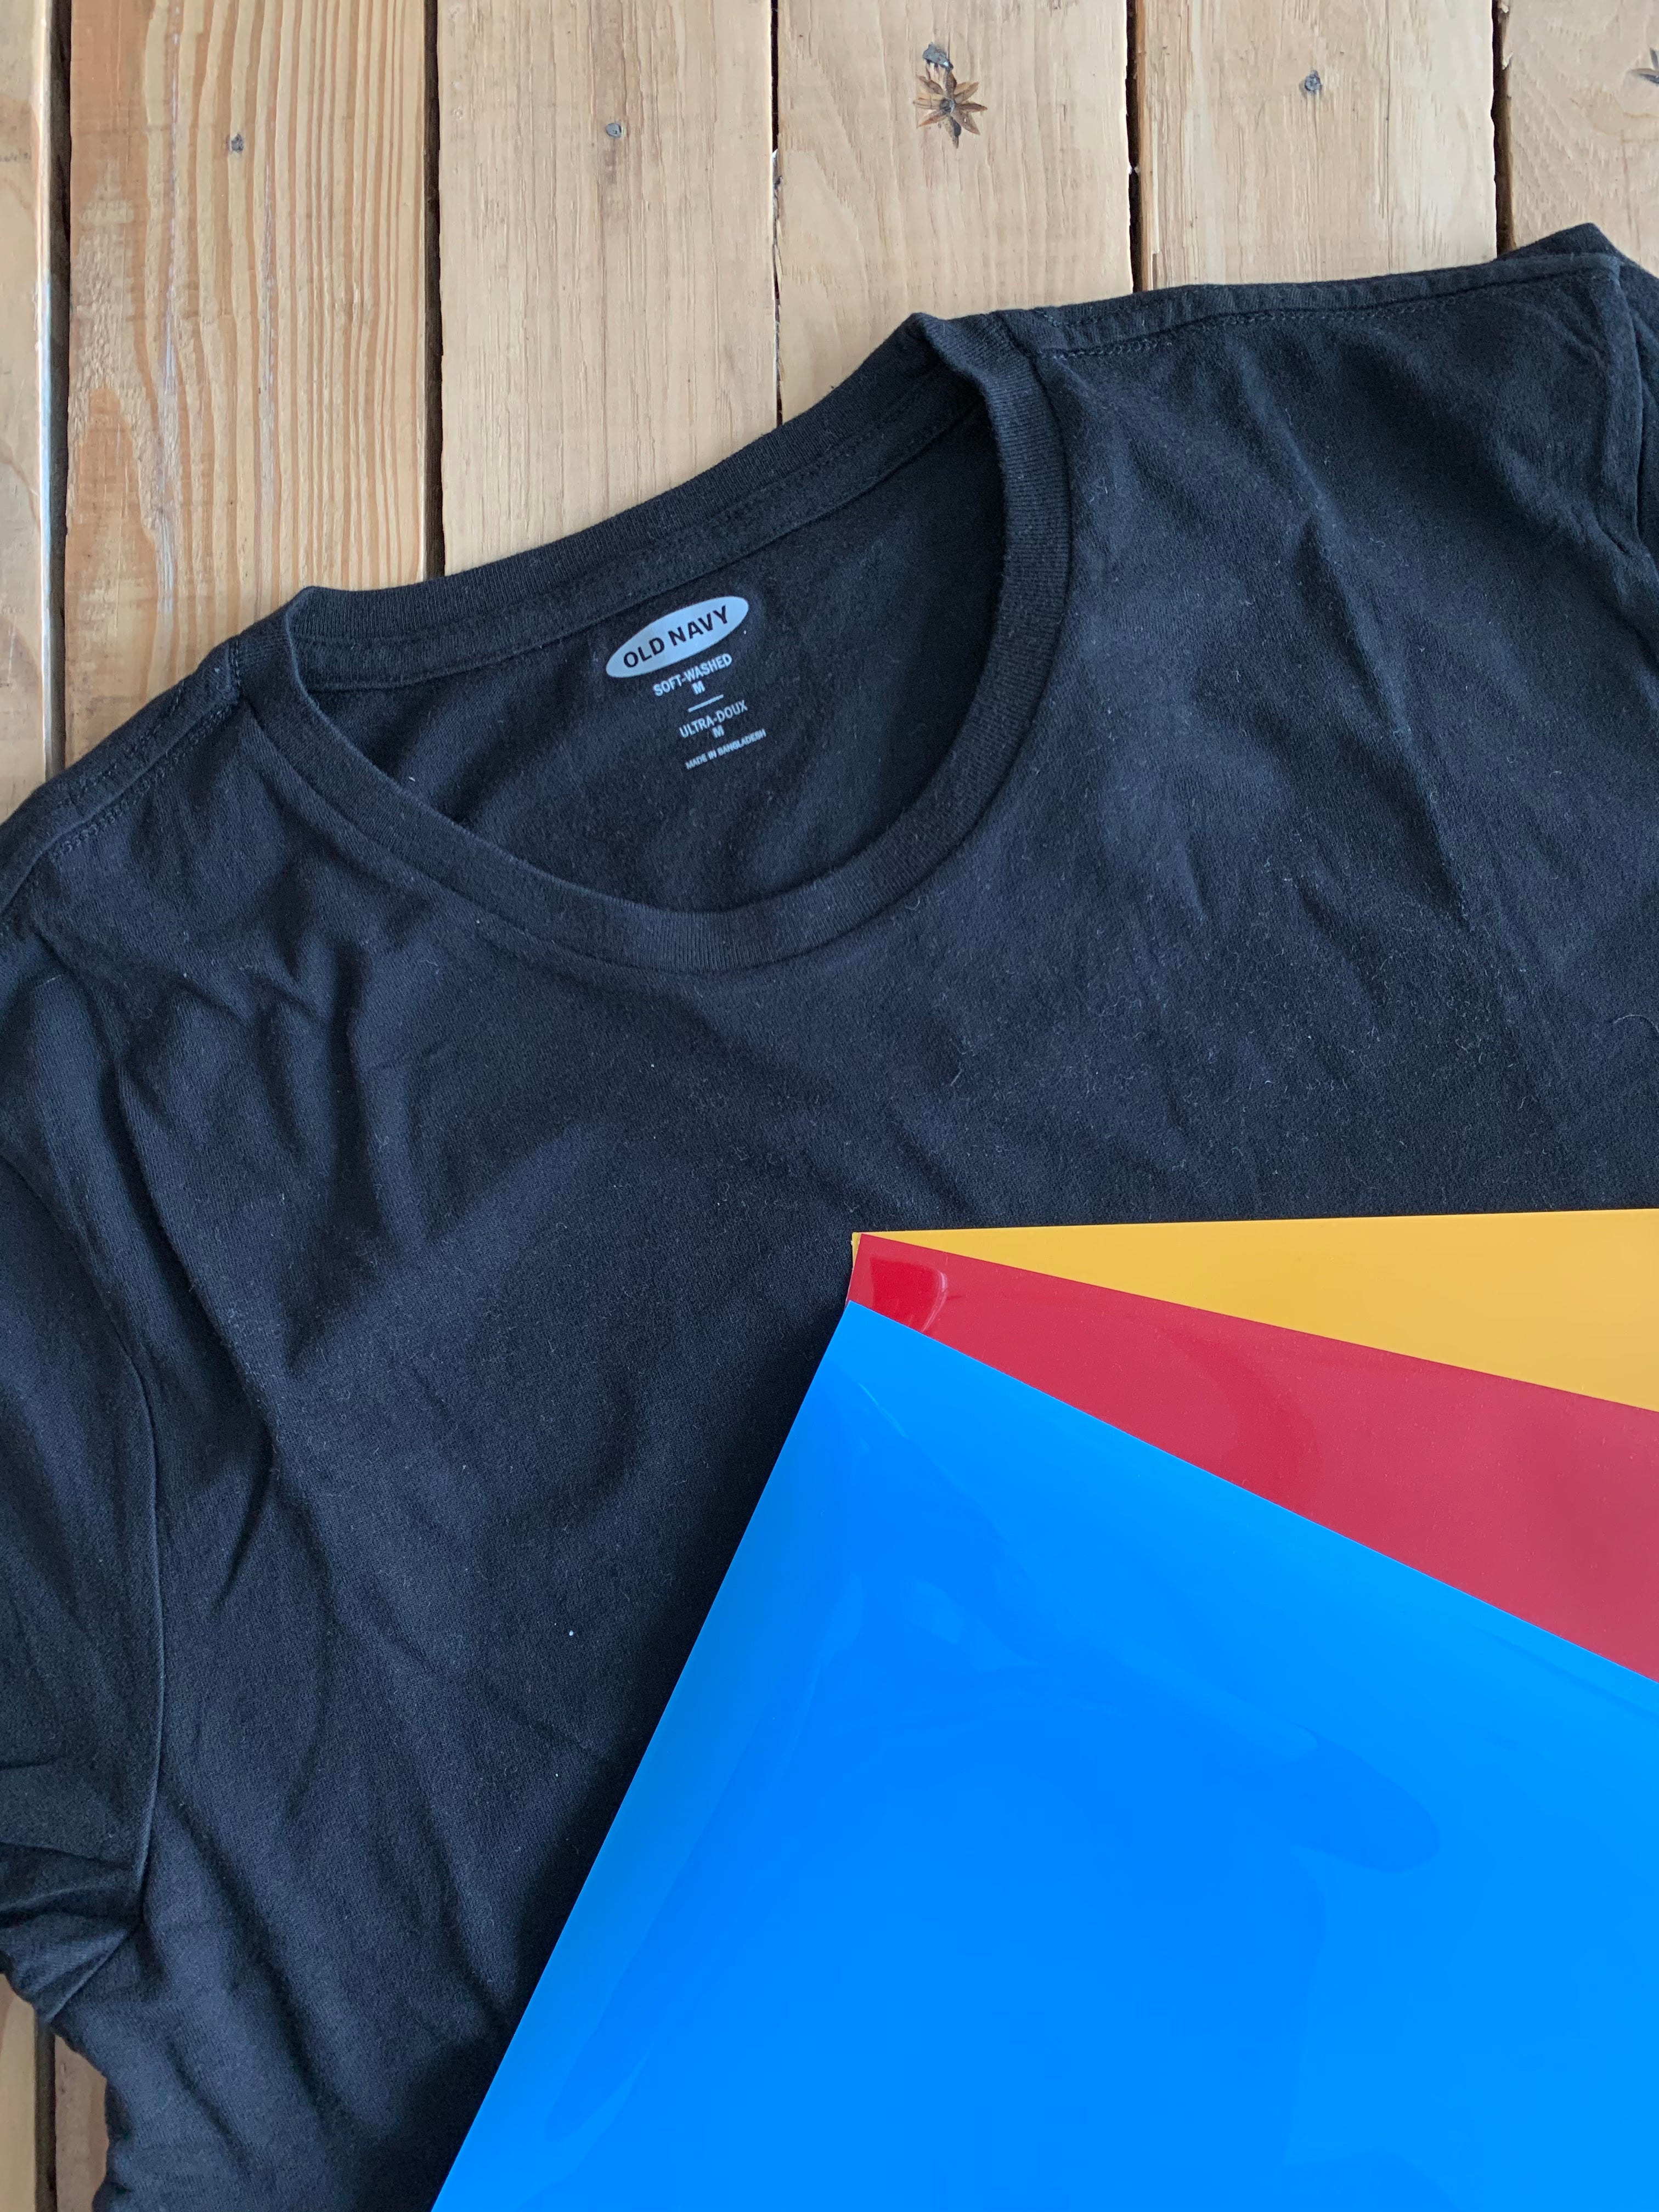
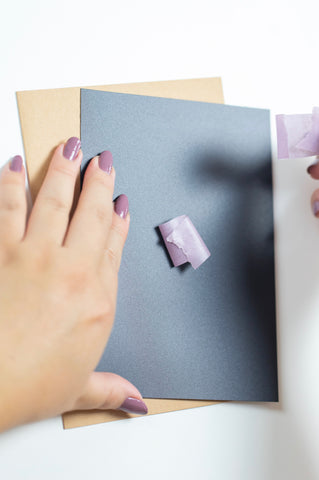
With the jars cleaned and prepped, we’re ready to add vinyl to them. Cut the designs out using your cutting machine, and the Kassa permanent vinyl colors of your choice. I really loved the combination of solid color with holographic for my designs. Each one has a mixture of both in different ways. I did some planning in advance in Design Space so that I could cut all of my different colors on one mat.
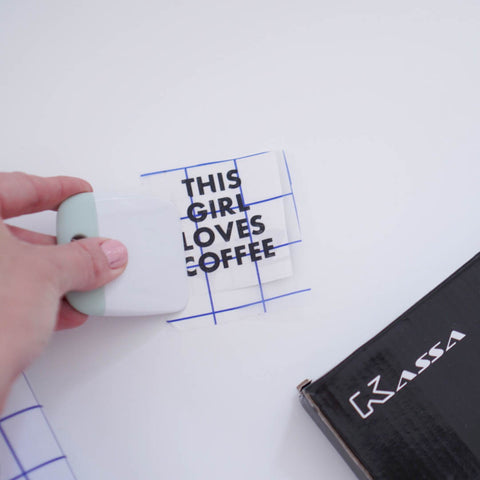
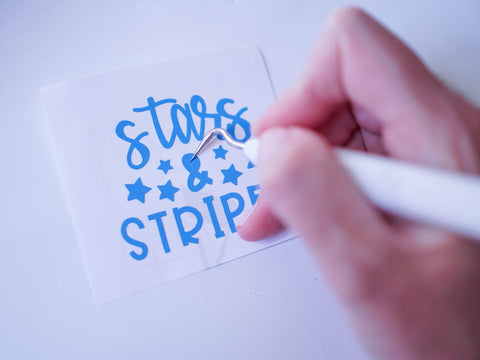
Weeding time! There are a couple of different techniques for weeding permanent vinyl. I recommend pulling out and small pieces first, and then pulling up a corner, removing the larger background area slowly. When possible keep the vinyl close to parallel to the carrier sheet. That way you have less chance of tugging your design up with the extra vinyl. If you have very small letters or shapes, a secondary option is to reverse weed. To reverse weed, you apply the transfer tape to the top of the entire unweeded design, remove the carrier sheet from the back, and carefully remove the extra vinyl, leaving the tiny design already stuck to the transfer tape.
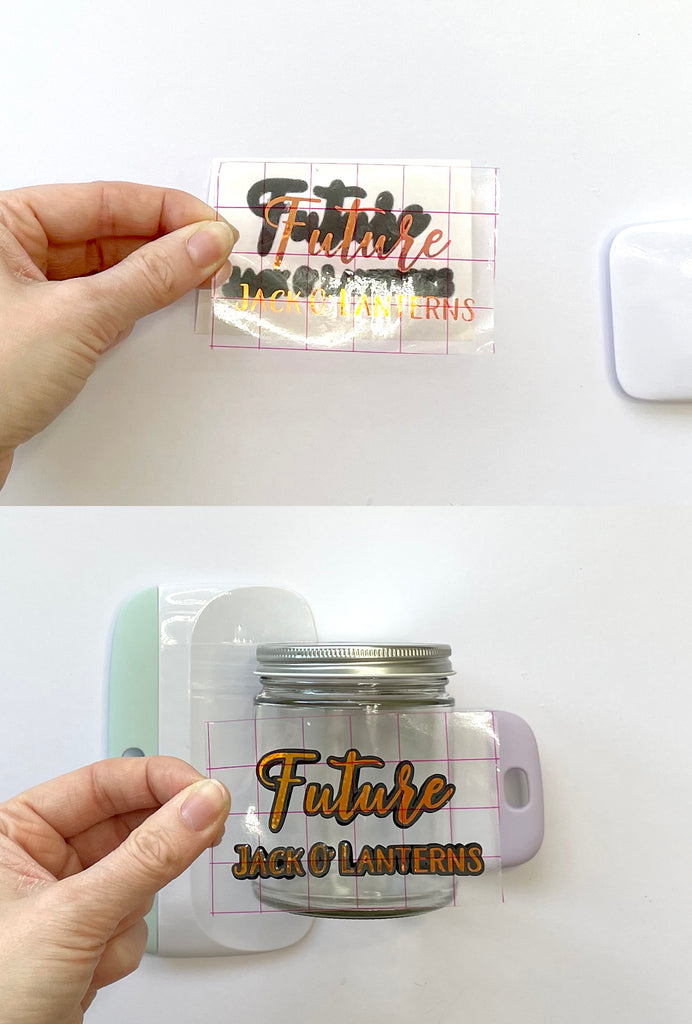
If you’ve chosen to do multiple layers for your design, it’s time to layer the vinyl. Using the transfer tape, start with the top-most layer. Carefully lay the transfer tape over your design using your hand or a scraper to make sure it’s adhered. Remove the carrier sheet. By eye, or utilizing the small shape method, place the layer on top of the next layer down. Repeat with all layers. If you’d like to use the small shape, you can add, for example, a small triangle in the same exact spot on each layer of your design. When you go to layer, simple lay each triangle over the next for perfect alignment. Remove the triangle from the transfer tape before applying to your object.
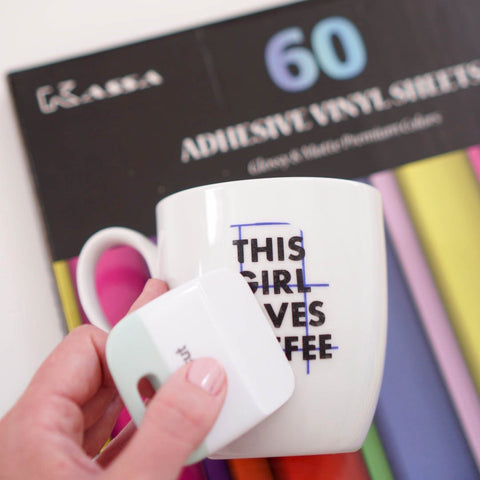
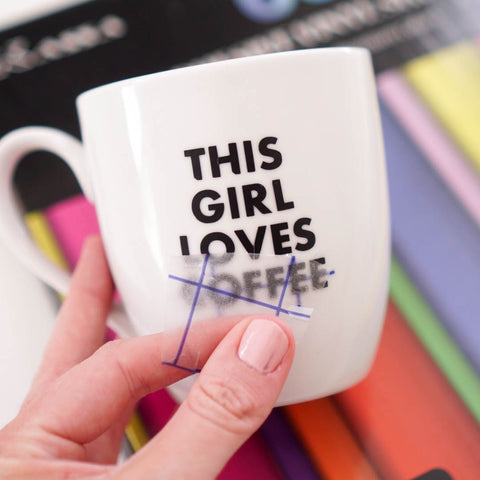
As these jars were fairly small, it was pretty easy to eyeball where I wanted my design to sit. If you have a larger object, creating a guide with masking or painter’s tape can be helpful. Once you’ve placed your vinyl design, slowly peel back the transfer tape, checking that the design is fully adhered. If anything doesn’t go to plan, make sure you peel it off right away as once this vinyl sets, it’s on there permanently.
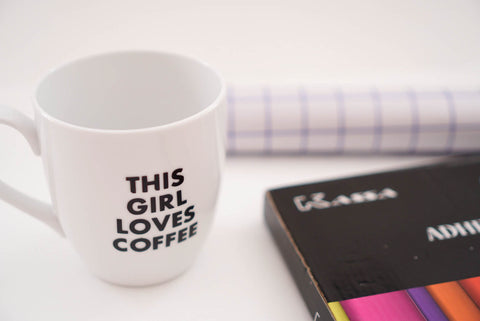
Your design Is all set, and you’re ready to use your jars! If you’re adding vinyl to an item that is going to be washed, make sure to let it cure for a few days and hand wash only.
This project was a great way to not only recycle some useful glass jars but also to add a little character around the house. Permanent vinyl labels are an easy, fun, and quick way to personalize a variety of objects. I’ve labeled toy bins and kitchen containers, but the options are endless. Have you used Kassa permanent vinyl to label jars? Don’t forget to tag me at @craftingshouldbemessy & @Kassa or #Kassamoment so we can see your projects!
]]>
To stay organized, I like to grab all the materials I need for a project before I get started. For this project, go ahead and grab a:
If you are using an SVG file, upload it to Cricut Design Space, or create your own!
Once uploaded, resize it to how big or small you want it to be.
When you are finished resizing, select the entire image, right click and hit “Attach”. This ensures all of the pieces cut exactly how it looks on the screen.
Cut out a piece of holographic vinyl about 4” by 4” and load it shiny side up on your cutting mat.
In Cricut Design Space, I selected “Holographic Sparkle Vinyl” as my cut setting and used normal pressure.
Hit “Go” on your Cricut, and watch your design cut out!
After the Cricut has finished cutting your design, it’s time to weed. With the shiny side up, carefully remove the excess pieces of vinyl so that only the words remain. You can do this with your fingers or a weeding tool. I am using the cricut weeding tool.
We are almost ready to apply the design to the water bottle! But first, we have to transfer it on to the transfer tape.
Cut a piece of transfer tape the same size as your design and carefully place it on top of your design, making sure there are no air bubbles underneath. Use a scraper or credit card and gently apply even pressure to the whole design ensuring that the vinyl will have a good grip on the transfer tape.
When you think it’s ready, flip the design over and peel. The design should stick right to the transfer tape, but if not that’s okay! You can repeat the scraping process until the vinyl is transferred properly.
Tip: cut tiny slits around the perimeter of the transfer tape. This will allow the vinyl to transfer to the bottle much easier without bubbles or messed up lines.
Carefully place your vinyl where you want it to go on the water bottle and gently press the design with your fingers. You can also use the scraping tool we used in the previous step.
Gently peel off the transfer tape and you have a beautiful customized holographic water bottle!
Hope you enjoyed this DIY project you can make with the Kassa holographic vinyl sheets If you use this tutorial to make your own DIY creations with the Kassa vinyl be sure tag @craftingbylizzy & @kassa or #kassamoment so we can see and spread the vinyl love!
]]>I’m Sarah from @ensigninsights and in this post I’m going to show you how to do chalk lettering on glass using the new pastel Kassa chalk markers. I like the look of chalk lettering but I don’t love the dusty chalk mess so I prefer using chalk markers. I like using glass because it’s so smooth and erases really easily when you want to change it. You can use any glass like a window, mirror, frame, or even a jar. In this post I’ll be using a frame with black paper is it looks like a chalkboard.
If you want to get the brush lettered look with chalk markers, you will need to do faux calligraphy. If you are unfamiliar with that, check out Kassa's Faux Calligraphy tutorial. It’s a really simple way to do all kinds of styles with your lettering.
Get your chalk markers ready. If they are new you will need to get the ink flowing by first shaking the marker and then pumping it until the ink saturates the nib. I really like these new pastel colors!
Hi everyone! My name is Avery, I am a young artist and I specialize in colored pencils and paint. Here is a tutorial I made to show you how to make a simple, decorative summer-themed painting using watercolors and liquid chalk markers!
For this first step, use your pencil to lightly sketch out the shapes of the fruits you’ll be drawing. This is just to map out where you’ll be placing everything on the page.
A strong composition usually entails careful planning, so take your time to decide how you want your painting to look before you begin. It will make the entire process easier if you know where you’re headed with it!
After gently sketching the basic shapes of everything, use an eraser to lighten the sketch you’ve created. Refine your sketch to make the shapes more precise and accurate. By now, you will have completed your sketch!
Fill your brushes up with water. You can squeeze the tube of the brush to let water out while you’re painting. Use the water in the brush to activate the watercolors, and pick out the colors you’ll be using in your painting. I chose to use colors like orange, yellow, green, and red in my artwork, but of course you can choose any colors you would like!
Once you’ve decided on the colors you want to use, it’s time to start filling in some of the fruits with base layers of watercolor. Dilute the watercolor by using more water than pigment. Now, fill in the sketches with the base layers. All you have to do is place the color very generally, and we will add details on top of this later.
What I did was choose two of the fruits to focus on (the orange and the lemon). I did the base layers for those and then used less diluted watercolor to add in shadows and to darken the composition where it needed to be darkened. You can use water or the diluted paint to blend your shadows with the lighter base layer.
Now that you’ve done a couple of the fruits, it’s time to do the base layers for the rest of your painting. Make sure you’re waited for the watercolor you’ve already placed on the paper to dry before continuing, just to be sure nothing gets smudged.
What I did for this step was fill in the strawberries and leaves, similarly to how I did with the orange and lemon. After that, I let everything dry again. Then, I added even more shadows to everything on the page, using the watercolor in its more pigmented form to do so.
Also, feel free to add in some other colors to create these shadows. In the orange, for example, I used a little bit of red for darker shadows. Also, on the leaves, I used a bright yellow in the brighter areas to make it look more 3D.
In this step, what you want to focus on is adding more contrast to your painting. Darken the shadows, but also try to preserve some highlights. To preserve the highlights, avoid layering more watercolors on top of the lighter areas to let the fainter base layer show through. This makes the painting more visually appealing.
In this step, use the liquid chalk markers to add more color to the painting. What I did was use the markers to draw some lines on the edges of the fruits. Then, I used a little bit of water on my brush to blend the marker into the watercolor.
This step is very simple, but it adds a lot of color to everything and brings everything together really nicely. Be sure to use the chalk markers sparingly though; if you overdo it, you may end up losing some of the contrast in your painting.
Once you’ve let everything dry again, you can add small details. I did this using the white liquid chalk marker, which gave the illusion of the fruits being shiny.
All you have to do is draw small dots/short lines in areas where the light would be reflecting off of the fruits, or in places where it’s supposed to be lighter. This is another simple step, but it makes a big difference.
This is the final step! First, be sure to add in any final details you may think are necessary just before you finish up. Now, use a metallic chalk marker to write the word “Summer” (or any other word or phrase you may like to use instead). I chose to write this in a cursive style, and then used the marker to thicken the lines of the letters where it was a downstroke.
This was my final product! You may need to try this project several times just to experiment and figure out how to use different techniques and determine what works best for you. It took me several tries to make a composition i was really happy with, so it’s ok to start over and try something different! I hope this was helpful, and I hope you have an amazing day!
Hope you enjoyed this watercolor project. If you followed this tutorial or used the Kassa pastel chalk markers to make your own colorful artwork, be sure to tag @_averyxdraws_ and @kassa with the hashtag #kassamoment to show us your ideas – we cannot wait to see your creations!
Hello everyone! My name is Jeannie Dickson AKA @jeanniedicksondesigns Today I will be sharing with you how to create a personalized back to school sign for the little ones! Im going to be using Kassa's newest product, Pastel Chalk Markers. Let’s get started!
Plan ahead what information you would like to include then section-off your chalkboard with masking tape.
Using regular chalk, lightly design your letters.
Use a microfiber cloth as an eraser.
On a separate piece of scrap paper, pump marker until paint reaches the tip. Begin painting in your letters.
Blend colors for each letter before paint dries
Adjust masking tape if you make any last-minute changes.
When you are done, peel off the masking tape.
That’s it! These chalk markers work so well and are sooo easy to blend! I know my kids will love their back to school signs!
Check out these other projects created with Kassa’s Pastel Color Liquid Marker set! They also work beautifully on glass!
Chalk markers let you make beautiful, colorful artwork. If you followed this tutorial or used the Kassa pastel chalk markers to make your own colorful artwork, be sure to tag @jeanniedicksondesigns and @kassa with the hashtag #kassamoment to show us your ideas – we cannot wait to see your creations!
Father’s Day is right around the corner & what better way to celebrate Dad than with a personalized shirt from all of his favorite littles! I’m Morgan and I used Kassa Heat Transfer Vinyl Sheets to create this adorable shirt! I used my SIlhouette Cameo machine & my Cricut EasyPress Mini, but you can recreate this project at home using any cutting machine and heat press - a plain old iron works too!
Cut out each part of the design in your preferred color - don’t forget to size the image to fit the shirt you chose!
Prep your shirt for heat! I love my Cricut EasyPress Mini for designs like this that are made up of a few different colors. It’s more precise than an iron & heats up more quickly. I used mine on the Medium heat setting for 300°F (150°C) – 355°F (180°C), started at the top of the design & worked down from there. Kassa HTV works best at a temperature of 305° F (150° C) - just apply medium pressure for 10-15 seconds and peel hot or cold! (I always peel hot - who can wait that long?!)
Hi everybody! Robyn from Pink Robyn Decor here to talk watercoloring. Perhaps you’ve always wanted to try watercolor lettering but didn’t quite know how or where to start. What supplies should you get? What watercolors are best? How will you ever get the paintbrush to function well enough to form a letter? I’ve been there! As a hand-lettering artist myself, and mostly using PENS to do my work, I used to wonder how I’d make the switch to learning how to letter with a paintbrush. But I’m here to tell you it’s easier than you’d think, if you try it out with a water brush instead of a traditional paintbrush. The water brush functions much more like a pen, but provides the watercolor result – and it’s so forgiving!
So let’s give it a shot. Let me show you how to create this “When it Rains, Look for Rainbows” lettering piece with a water brush pen.
Hey crafty friends! I’m Isabel from @TheCraftySitu and I’m here to show you how to make a kids craft I’m calling coloring page shirts! This is a simple craft that will have children entertained and the best part is that it can be used over and over again. I’ve created 3 FREE SVGs just for you and provided helpful tips. I know first hand staying inside with kiddos and not being able to go out is hard but with a little paint and Kassa we can get through this!
Download and upload the SVGs to your cutting program. Resize the designs to fit your shirts. I suggest going bigger than normal to give them more space to paint.
Hi friends I’m Ivy from @ivypinkmade. We are currently in the process of decorating my kid's bedroom. I have this little space underneath this book shelf that we wanted to be decorative but also functional. That’s when I thought oh a chalkboard! The bedrooms theme is Mountains & Teepees, so I wanted to incorporate that & that's when I had the idea to make a triangle chalkboard. Let's get started.
What better way to welcome the season of pastels, florals & delicious candy than with a custom spring mug that will make you chuckle every time you use it? I’m Morgan, of Love & Lilacs, and I used Kassa Vinyl Sheets & Vinyl Transfer Tape to create this adorable coffee mug! I used my SIlhouette Cameo machine, but you can recreate this project at home using any cutting machine!
Choose your blank coffee mug & download the SVG file here. Any coffee mug will work - I went with this pretty pastel blue mug from Crate & Barrel because it already reminded me of springtime!
A customizable monthly calendar is a fun project that can have BIG impact on your room. I am Caitlin from Crafting Should Be Messy, and I used the Kassa Dry Erase Contact Paper to create this personalized wall calendar. I utilized my Cricut cutting machine to cut out rounded rectangles for each day of the month. If you don’t have a cutting machine, you could turn these into regular rectangles as well!
Hello fellow makers! Kolbie from This Writing Desk here, with a quick and easy tutorial for V-Day cards this season. Kassa’s Watercolor Set has just about everything you need to send your friends and family some handmade love and practice your watercolor basics at the same time. We’re going to make four different cards using wet-on-wet magic to blend colors and shapes.
First, take out a sheet from the watercolor paper pad that’s included in the set, and tape it down with masking tape to your table or desk, divided into four sections. To make sure each card has the same border all the way around, I have a special trick for taping through the middle: overlap two pieces of tape so the length overlapped equals the length hanging off the edge of the paper, like below.
There is no better gift than something handmade, and Valentine’s Day is all about crafting your heart out! I’m Karen from Lettering By Karen, and today I will be sharing with you a simple, definitely sweet Valentine’s Day gift that is bound to make that special someone smile. There are so many different ways to personalize this gift. I know I’m already thinking about the next one that I’m going to make! Let’s get started!
Gather your materials. If you’re using Kassa chalkboard contact paper, a cloth and chalk will come inside of the contact paper roll. Measure the side of your bucket to determine what size to cut the chalkboard contact paper. Today, I will be going over two different methods to cut your shape out of the contact paper. For this project, we will be using an oval.
National Handwriting Day is this month! My name is Mai Britt from @addmanilla. Let’s celebrate this amazing day with a ‘how-to-use-chalk-markers-on-glass’ tutorial.
Remove the glass out of your photo frame. Place it on top of your sketch paper and draw an outline with your pencil creating "borders" for you stay within when creating your artwork. Cut the colored paper to match the size of the glass as well.
Add your decorations and lettering artwork onto the grid paper. First start with the lettering. I alternated between cursive and print fonts for the words "Happy national handwriting day". A good tip is to use the grid as a guide so that the height & width of each letter is proportional.
5, 4, 3, 2, 1! Happy New Year! My name is Jeannie Dickson AKA @jeanniedicksondesigns Today I will be sharing with you how to create these fun chalkboard party hats! You can create several of them and have your family and friends personalize with the colors and text of their choice! My kids can’t wait to make and wear theirs to help ring in the New Year! Let’s get started!
Hey crafters, Kayla here from the Kayla Makes and today I'm working with Kassa's new line of heat transfer vinyl. In this quick and easy tutorial, I'll show you how to cut, weed and apply htv to create your own set of matching family pajamas for the holidays.
Hey friends! My name is Shelly Kim of Letters By Shells. Today, I'll be sharing how to personalize your tote bags using Kassa's new HTV vinyl! I'm super excited to share my process with you when it comes to designing an artwork piece and how I use the Silhouette Cameo machine to cut my vinyls. I had a wonderful time creating this artwork piece and these SVG files for you! I hope you all enjoy! Let's get crafty and vinyl all things!
Tis the season of being thankful, gifting & decorating!l! Megan here, from Lovebird Heartworks and I am SO excited to share these projects with THREE FREE SVGs that I created just for you!!
Start by downloading the SVGs and uploading into your cutting software. Adjust size for your project. When changing the sizing be sure to keep each group together. Each of these designs have been sliced and set to fit perfectly together like a puzzle.
When placing the HTV onto your cutting mat take note of the side that has the Protective Blue Film. This is the side that will go UP on your mat. Once you have smoothed your HTV onto your mat, remove the Protective Blue Film.
Make sure to select the mirror option in your software for your design. Then cut using the iron-on setting.
Use the included weeding tool to remove the excess vinyl around your design.
Stack each layer on top of each other (as shown below) to make sure that you’ve got all the pieces weeded properly, this is also a great way to make sure that you place everything in the right spot when you start heat pressing. I like to have the largest part of the design on the bottom.
Hey there, my name is Carmille from Carmille And Stuff and I'm here to show how you can create a pumpkin themed custom shirt design using HTV vinyl. The vinyl can be machine-washed so your design will never get faded over time. Kassa just released this BRAND NEW vinyl and I'm so excited to create with it!
This page content is generated by GemPages.
For more information, please visit: https://apps.shopify.com/gempage
It’s officially Fall, ya'll! I’m Megan from Lovebird Heartworks and I am SO excited to share this project and FREE SVG that I created just for you!
So today, I'm walking you through the tips and tricks I use to make sure the process is foolproof.
This is a big step that a lot of people skip but it's a must do if you want the adhesive vinyl to adhere properly to the surface of the mug.
Using a cotton pad or clean cloth, spray the mug with isopropyl alcohol and wipe clean. Allow the mug to dry completely.
Another mistake that is easy to make is to forget to check the cut settings on your particular machine before you begin cutting. If you do this, the vinyl may not cut all the way through or on the flip side, you may cut all the way through the paper backing, making it difficult to weed.
To adjust the cut settings in Cricut Design Space, simply select the material you're using (adhesive vinyl) and then in the following window you can adjust the blade pressure to less, default or more. For Kassa Adhesive Vinyl I use the default setting.
To many times I've heard of people attempting to use dollar store contact paper as transfer tape. To be honest, it just isn't the same. When you're working with adhesive vinyl you want to use a transfer tape that is made for adhesive vinyl.
Kassa Transfer Paper was created to work especially with Kassa Adhesive Vinyl. Cut a piece of transfer tape just large enough to cover the design and use a scraper tool or something similar to apply firm pressure over the design.
Coffee mugs are almost always curved. This makes it difficult to apply a flat vinyl image, but it isn't impossible!
Use sharp scissors to cut as close to the design as possible and then go around the edges of the transfer tape and cut small slits all the way around. This will help the decal form around the curvature of the mug.
This is an important one. You can't just place the vinyl decal on the mug, give it a little rub and then attempt to remove the transfer tape. The vinyl will peel away with the transfer tape 100% of the time.
To avoid peeling up your decal, burnish over the entire design over and over again. I use my scraper tool and firm pressure to pass over the entire design 10-15 times. Usually after that I go back with my fingers and press everything down again.
I'm all for ripping off a bandaid but when it comes to adhesive vinyl you want to take it S-L-O-W.
Peel downward and at an angle nice and slow. If you happen to have any pieces that want to lift off of the mug, just press them back down and continue peeling away the transfer tape.
That's all there is to it! With these tips and tricks you'll be a professional mug maker in no time.
Download the SVGs HERE and try to make your own mug! Tag us with #kassamoment ❤️
]]>
Paint your wooden frame. You can choose a solid color or any combination of colors. I wanted a rainbow gradient so I chose 6 of the main colors: yellow, orange, pink, purple, blue, and green. I started to paint in a corner and then proceeded to add the next color to the top, and to the right, one by one. No matter how many colors you choose, it is best to work on small sections at a time because the paint will dry quickly and you want to be able to blend it all smoothly.
As your frame dries, roll out your chalkboard contact paper and flip it upside down. Place the backing for your frame on top to cut out the contact paper. Make sure to leave about a 1 inch border so you can fold the contact paper onto the back, giving you a seamless look all around.
Peel off the back of the contact paper and place it back down, sticky side up. Place the back of your frame on top and smooth over, checking the front for any air bubbles or creases. Before folding the edges of your contact paper over, cut out small triangles at every corner. This will prevent any excess contact paper at the edges of your folds, which would prevent the back to be nice and smooth.
Tip: If you are repurposing a frame where the backing does not come out, you can still cover it with the chalkboard contact paper. Simply measure the height and width of the space you want to cover up and use those measurements to cut out your contact paper. Once you have it cut, slowly peel and adhere the contact paper starting in one corner instead of peeling it all off at once.
Once your frame is dry, insert your backing to customize it! I like to work on it inside the frame because my frame takes up some of the chalkboard area and I do not want my letters to get cut off. But, feel free to use a pencil to measure a border if you prefer to letter on your chalkboard outside of the frame.
I chose a few of the most common topics for a First Day of School chalkboard, but feel free to customize it to your little one’ s interests! Below are some of the most common topics to record:
You can add as many or as little information on the chalkboard that you desire. It’s all about customizing it for your child!
If you use this tutorial to make your own DIY creations with the Kassa fine tip chalk markers be sure tag @veronicaletters & @kassa or #kassamoment for a chance to be featured
]]>Hi everybody! Today we are so excited to announce our new Fine Tip Chalk Markers! We've partnered with Shelly Kim from Letters By Shells to show the perfect DIY projects that you can do with our 3 mm fine point chalk markers.
Materials you'll need:
Prep your Kassa Fine Tip Chalk Pen and get your craft bag ready!
Draw diagonal lines (about 2” in height) across the craft bag (from left to right) using the chalk pen and ruler for a guide
The lines should be drawn across the entire craft bag
Then in between those lines, start drawing loops (of course, any loops/patterns work). Just have fun with it!
Continue drawing the loops throughout the entire craft bag in between the lines
Awesome! You are all set. This craft bag can be used for anything including birthday gifts and anniversary gifts
Materials you'll need:
Measure, size and cut the chalkboard paper. The goal is to have the chalkboard paper centered with the card. In this case, I cut the chalkboard paper slightly smaller than the card size.
Tape down the chalkboard paper on the card, center the chalkboard paper, and press down firmly. I used regular tape, but you can definitely use hot glue, tacky glue, etc.
Sketch (not pictured) and write a positive quote using the metallic gold chalk pen for a nice pop. Have fun with this process by creating multiple compositions for the quote. I decided to hand letter the 1st and 3rd words in script and the 2nd word in non-script.
Using another color, create some borders or a fun pattern to compliment the quote. I decided to draw some leaves as a wreath.
Optional— I used a faux calligraphy technique and decided to add a parallel line to make my downstrokes thicker.
Yayy! You now have a card that can be used for any occasion! Gift this card to someone who needs a positive reminder that anything is possible!
Materials you'll need:
Dip your paintbrush into the acrylic paint and apply a thin layer of paint on the acrylic tile.
Continue painting a few more rough strokes.
Continue this process (step 2), but slowly paint a couple more strokes higher and lower from the center point.
Let the paint dry and then flip the acrylic over. We will be writing on the side where there is no paint.
Using Kassa’s Fine Tip Chalk Marker, start lettering your best friend’s name or an inspirational word. I decided to write Kassa’s name because they are pretty amazing! ;)
Let the chalk marker dry and then use this place card for any occasion!
TIP: I personally enjoy using the chalk marker on acrylic because it’s solid and opaque. Also, if you mess up, the chalk marker can easily be removed with a wet paper towel!
You are all set! I absolutely love these place cards because they can be used for any occasion, décor and even gift tags! The possibilities are endless!
If you use this tutorial to make your own DIY creations with the Kassa fine tip chalk markers be sure tag @lettersbyshells & @kassa or #kassamoment for a chance to be featured
]]>Hi everyone! This week we've partnered with Lettering by Karen to show you the process of creating a DIY milestone board on a clear acrylic surface. To keep things organized, Karen broke down the milestone board into 4 parts: a main banner, stat circles, interests, & decorations.
Grab your art paper and a pencil. Start by making a simple banner by following these steps:
Step 1: Pencil in your child's name centered at the top of your paper. If you are using the same size plexiglass that I am, make the name about 4 inches long. You can keep it simple or add some lettering effects.
Step 2: Draw a curved line above the name. This will be the top of your banner. You can make it as long or as short as you like.
Step 3: Draw a matching curved line for the bottom of your banner. This line should be slightly shorter. Its ok if it’s not absolutely perfect…remember, this is art!
Step 4: Connect your top and bottom lines with two short vertical ones.
Step 5: Draw a line a little more than halfway up each side of your banner to create the top of the “tails.” Then draw another line below the banner that is a little longer and ends closer to the center.
Step 6: You can leave your tails open or close them off by drawing a sideways “v” shape, connecting the top and bottom.
Step 7: Make a small curving line connecting the bottom corner of your banner to the place where the tail connects to it. This creates the appearance that the banner is folded.
Just remember, don’t worry about perfection here. The sides don’t have to be identical…they wouldn’t be on a real banner either.
Next, create 3 large circles that will represent the most important numbers. Here the circles represent "age", "height", & "weight"
Step 1: Take a bowl or plate and trace 3 same size circles under the banner
Step 2: Write a title for each stat circle.
Step 3: Draw some simple leaves around the circle for decorations
Step 4: Fill in the center with big numbers that represent your child's stats.
Now a good portion of your board is filled in. The rest will be for any variety of fun facts you’d like to include about your baby. Things like:
Karen filled the top of the remaining portion of the chalkboard with “I love to” phrases in nice, big letters that span the width of that space. Then, for some visual interest, Karen divided up the bottom portion in two or three sections, to have smaller areas where some other fun facts can be included.
Before beginning a new line, place a ruler beneath where you plan to write the letters, to make each line straight and level. Again, remember to choose a different style of writing for each line and practice ahead of time if you’re not really comfortable with a particular font.
The remaining space on the bottom can be filled with decorations. In this case it was birthday cupcakes.
Now that you completed all the parts of your milestone board and filled each section in with your child's stats and info, it's time to put it all together. Take the acrylic plexiglass and place it on top of your art paper. Then grab some chalk markers and trace over your drawings and writing.
You can even blend colors together for your words. Try taking the rose gold color and coloring the top half of your child's name. Then use the regular gold marker for the bottom half. This will give a very cool ombre effect. Take your time and trace over every section until you finished the entire chalkboard.
If you use Kassa chalk marker to create some of these chalk lettering effects in your own artwork be sure and tag @letteringbykaren and @kassa & use #kassamoment for a chance to be featured!
]]>Hey everybody! This week we wanted to introduce you guys to some techniques for creating different chalk marker lettering effects. We've partnered up with Teela from Every Tuesday who helped create an intuitive guide showing all kinds of ways you can use our chalk markers while lettering. We couldn't be more excited! Follow along with the instructions and the video to recreate this on your own. Be sure to also download the practice sheets underneath the video!
Be sure to follow along with the video to see how each effect is created and download the cheat sheets needed here:
Write out your base word. In this case it is "chalk". Then add an outline on the outside and on the inside of that base word to create a consistent block lettering look.
Add an outline around each block letter using a different colored chalk marker (white is shown).
Make your block letters stand out even more by making them 3D! Refer to the cheat sheet above to see how the outline falls for each letter and try to replicate it for your own lettering.
Using your paintbrush with a little bit of water, pull the chalk ink away from areas that are being overlapped throughout your script word. These open areas is where the black chalkboard peaks through and will give a 3D look to your script lettering.
Shade in your outline with at least 2 different colors to simulate depth even more. Refer to the 3D cheat sheet below for color placement.
Grab a color that mixes well with your base color (yellow on top of pink is shown). Pump out some chalk marker ink in an open area of your chalkboard. Using a paintbrush, pick up that new color and begin painting on top of the base color, thicker at the top, then mixing with the base color as you move down to create a gradient effect.
Note: Be sure to wipe off any excess chalk from your paintbrush in between switching colors
Reference the highlight pink cheat sheet above. Pump out some chalk ink and use a paint brush to make a fine, thin line on the outside of your script lettering, creating a highlight effect. You can use the white color as shown and any color you want.
Reference the shadow cheat sheet above and paint a thin line, leaving some space between the edge of the letters and the shadow line. This gap is what will create a floating shadow effect.
Recreate your base lettering inside block lettering (single line letters), or use dots (as shown) or any other pattern you like.
Pump out 2 similar colors to your your base script lettering. Use your paintbrush and the brightest of the two colors to randomly paint streaks inside the base word. Next, grab your second color and repeat the same process for a cooler effect.
Once you are done with your lettering project be sure to erase any excess chalk ink puddles on the side of your chalkboard. The chalk ink is water soluble so you can use a damp cloth or a Magic Eraser.
If you use Kassa chalk marker to create some of these chalk lettering effects in your own artwork be sure and tag @everytuesday and @kassa & use #kassamoment for a chance to be featured!
]]>
To begin, upload the stars and stripes SVG into Design Space and then use the shapes tool to create multiple sizes of stars and duplicate them until you have enough to cover the number of cups you plan to decorate.
Place the sheet of vinyl on the cutting mat with the colored side facing up and load the mat into the machine. Double check that the correct blade is loaded and the machine is set to the vinyl cut setting. Then, press the flashing start button to begin cutting.
Repeat this step for each color of vinyl.
After cutting is complete, remove the excess vinyl from around the designs using a weeding tool where necessary to remove the smaller pieces.
Apply a piece of transfer tape over the vinyl and use a scraper tool to apply pressure over the entire design.
Align the decal onto the cup and press down firmly using your fingers or the scraper tool again. Carefully remove the transfer tape, leaving behind just the vinyl decal on the cup.
The stars can easily be placed by hand. Just peel them away from the paper backing and place them around the cup.
Alternate applying red, white and blue stars until the cup is covered.
That's all there is to it! You can even add a festive paper straw for an extra pop of color.
These cups are a great way to add a bit of customization to any party and they're much more affordable than their pre decorated counterparts.
If you try this project, be sure and tag @kayla_made and @kassa & use #kassamoment for a chance to be featured!
]]>